
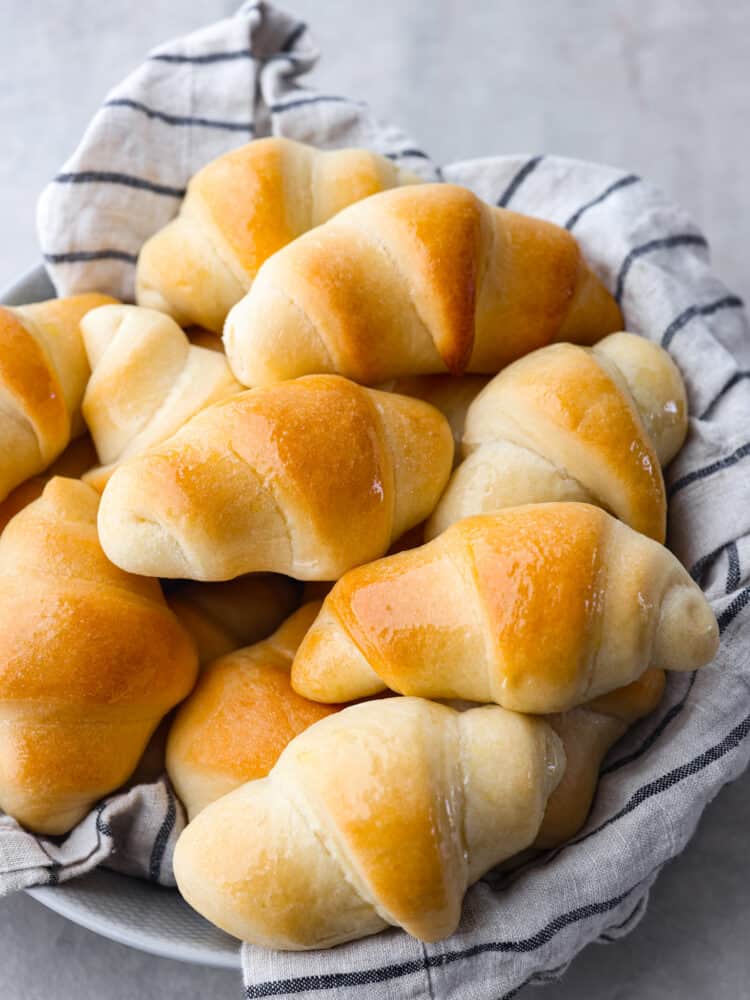
If you are looking for the perfect roll that goes with every single meal, then you’ve found it! These homemade crescent rolls are soft, golden brown, and have a delicious and buttery taste.
Make all these recipes for any dinner, and you will have a meal to remember! Cook up this cheesy asparagus stuffed chicken, this Olive Garden salad and these super easy crockpot mashed potatoes for a meal that the whole family will love!

Homemade Crescent Rolls Recipe
I love a good roll recipe and I can’t resist these cresent rolls! They are so buttery and flakey and basically melt in your mouth. The golden brown outside combined with the soft texture on the inside will make you eat at least a few of these with any meal! Trust me when I say that you should double the recipe so that you can wat them with your meals all week!
Crescent rolls are simple and easy to make and my family goes crazy over them! I mean, we love any kind of dinner rolls but these crescent rolls quickly made their way to the top of our list of favorites! These puff up so perfectly that once you make the homemade version, you will never buy them in a can again!
Ingredients You Need
These homemade crescent rolls are made from ingredients that you probably already have in your kitchen. They are so easy and delicious! Check out the recipe card at the bottom of the post for exact measurements.
- Dry Active Yeast: This is what will make your rolls rise.
- Granulated Sugar: A little bit of sugar is necessary in rolls to make them taste delicious!
- Warm Water and Warm Milk: These will be mixed together with the yeast to activate it.
- Unsalted Butter: I use unsalted butter that is softened to room temperature for the dough.
- Egg: An egg that is at room temperature is necessary for this dough.
- Salt: The salt will enhance all of the other flavors.
- Flour: I use all purpose flour in this roll recipe.
- Salted Butter: This is to brush on top so you will melt it first!
How to Make Crescent Rolls
These rolls are so simple to make! Your kids will love helping you roll out the dough, cut the triangles and shape them up into a crescent shape!
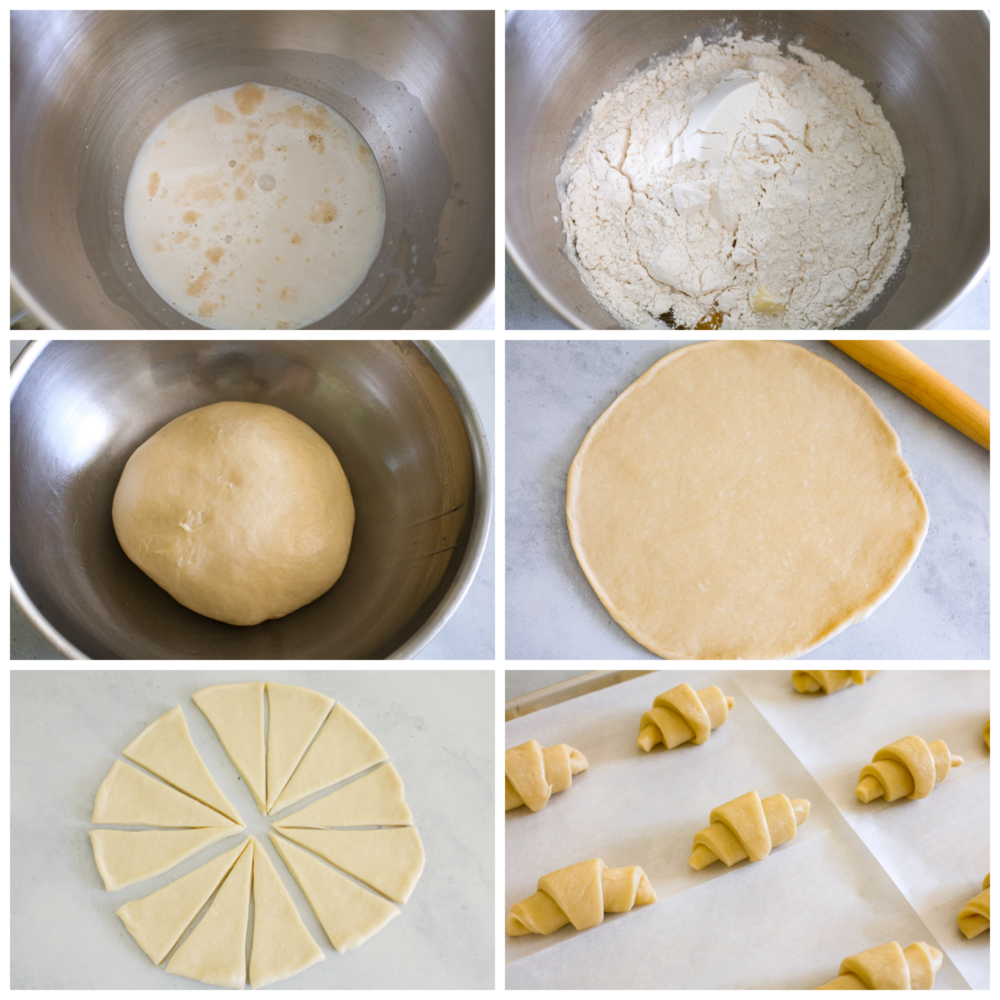
- Activate the Yeast: Add the yeast, 1 tablespoon of granulated sugar (reserve the remaining sugar for later, warm water and warm milk. Stir to combine and then set aside for 5-10 minutes, until the yeast is frothy and bubbly.
- Combine the Ingredients: Add the butter, egg, salt, and 2 cups of flour. Use the paddle attachment to mix on low until combined. Scrape down the paddle and replace it with the dough hook attachment. Mix on low speed and add the remaining flour ¼ cup at a time until a soft dough forms and is only tacky to the touch, not sticky.
- Knead with Mixer: Increase the speed just slightly and let the mixer knead the dough for 6-8 minutes, until smooth and elastic.
- Let it Rise: Form the dough into a ball and place in a lightly oiled bowl. Cover and let rise in a warm place for an hour, until doubled in size.
- Punch, Roll, Cut and Shape: Once risen, punch the dough down and split into two even portions. Form a ball with each and then roll out into a 12-inch circle. Use a large sharp knife or a pizza cutter to cut the circle into 12 equal sized wedges. Roll the wedges from the wide part to the narrow part to form the rolls. Place on a parchment lined baking sheet. Repeat with the second ball of crescent roll dough.
- Let it Rise (again): Cover and let rise for 30-45 minutes. While the rolls are rising, preheat the oven to 350°F and melt 3 tablespoons of butter.
- Bake: Bake for 12 minutes and brush with butter immediately after taking them out of the oven. These are best enjoyed fresh and are arguably even better when still warm out of the oven. Enjoy!
What’s the Difference between Croissants and Crescent Rolls?
A lot of people get confused and think that croissants and crescent rolls are the same things but they aren’t! They are completely different.
- Croissants: Croissants is French for crescent but they are different from crescent rolls because of their texture. These are often seen in France and have a very flakey outside texture.
- Crescent Rolls: Crescent rolls have a similar texture to dinner rolls except they are rolled and shaped into a crescent shape.

How to Store Leftovers
If you have leftover homemade crescent rolls (or want to make these ahead of time) then here are a few tips on how you can store them so that they stay soft and fresh.
On the Counter: I like to place my rolls into a ziploc bag or an airtight container to keep them fresh. They will last about 3-4 days!

Homemade Crescent Rolls
Ingredients
- 1 Tablespoon Dry Active Yeast
- 1/3 Cup Granulated Sugar Divided
- ¼ Cup Warm Water
- ¾ Cup Warm Milk
- ½ Cup Unsalted Butter Softened
- 1 Large Egg Room Temperature
- 1 Teaspoon Salt
- 3 ¾ Cups All-Purpose Flour
- 3 Tablespoons Salted Butter Melted
Instructions
-
Add the yeast, 1 tablespoon of granulated sugar (reserve the remaining sugar for later, warm water and warm milk. Stir to combine and then set aside for 5-10 minutes, until the yeast is frothy and bubbly.
-
Add the butter, egg, salt, and 2 cups of flour. Use the paddle attachment to mix on low until combined. Scrape down the paddle and replace it with the dough hook attachment. Mix on low speed and add the remaining flour ¼ cup at a time until a soft dough forms and is only tacky to the touch, not sticky.
-
Increase the speed just slightly and let the mixer knead the dough for 6-8 minutes, until smooth and elastic.
-
Form the dough into a ball and place in a lightly oiled bowl. Cover and let rise in a warm place for an hour, until doubled in size.
-
Once risen, punch the dough down and split into two even portions. Form a ball with each and then roll out into a 12-inch circle. Use a large sharp knife or a pizza cutter to cut the circle into 12 equal sized wedges. Roll the wedges from the wide part to the narrow part to form the rolls. Place on a parchment lined baking sheet. Repeat with the second ball of dough.
-
Cover and let rise for 30-45 minutes. While the rolls are rising, preheat the oven to 350°F and melt 3 tablespoons of butter.
-
Bake for 12 minutes and brush with butter immediately after taking them out of the oven. These are best enjoyed fresh and are arguably even better when still warm out of the oven. Enjoy!
Nutrition
from The Recipe Critic https://ift.tt/Zk9ltIC

Comments
Post a Comment